lms_user_id) in Azure AD (Microsoft Entra ID) that can be used with LMS integrations. These attributes allow you to map user identities between your platform and the LMS provider.
Access Azure AD Admin Center
1
Log in to Azure AD
Log in to the Azure AD Admin Center at https://aad.portal.azure.com/
2
Navigate to Enterprise Applications
In the left navigation menu, click on Enterprise applications.
3
Select Your Application
Find and click on the application that will be used for SSO with your LMS integration.If you haven’t created an application yet, click New application and either:
- Search for your LMS in the Azure AD Gallery
- Create a Non-gallery application for custom SAML configuration
Configure Single Sign-On
1
Navigate to Single Sign-On
In your application’s overview page, click on Single sign-on in the left menu.
2
Select SAML Method
Choose SAML as your single sign-on method if not already selected.
3
Configure Basic SAML
Complete the basic SAML configuration with your LMS-specific URLs (if not already configured):
- Identifier (Entity ID): Your LMS entity ID
- Reply URL (Assertion Consumer Service URL): Your LMS ACS URL
- Sign on URL: Your LMS SSO URL
Configure User Attributes & Claims
1
Edit Attributes & Claims
In the SAML configuration page, find the Attributes & claims section and click Edit.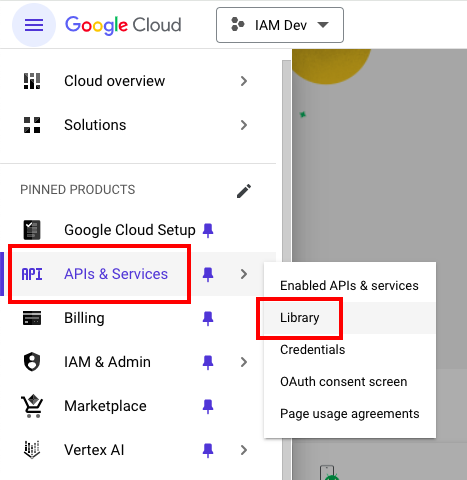
2
Add New Claim
Click Add new claim to create a custom attribute for your LMS integration.Configure the new claim with:
- Name:
lms_user_id(or the specific attribute name required by your LMS) - Namespace: Leave blank or use your organization’s namespace
- Source: User attribute
- Source attribute: Choose from available options:
user.userprincipalname- for email-based identifiersuser.objectid- for Azure AD object IDuser.mail- for email addressuser.employeeid- for employee ID- Custom extension attribute (see next section)
The exact attribute name and source will depend on your specific LMS requirements. Common LMS platforms may require different configurations:
- Docebo: Often uses
user.userprincipalnameoruser.mail - Cornerstone: May require
user.employeeidor custom identifier - SAP SuccessFactors: Typically uses
user.userprincipalname
3
Add Additional Claims (Optional)
If your LMS integration requires additional user attributes, repeat the previous step:Common additional claims include:
- givenname:
user.givenname - surname:
user.surname - emailaddress:
user.mail - employeeid:
user.employeeid - department:
user.department - jobtitle:
user.jobtitle
4
Save Configuration
Click Save to apply your attribute and claims configuration.
Configure Custom User Attributes
If you need to use custom attributes that aren’t available in the default Azure AD user schema:1
Navigate to App Registrations
In the Azure AD Admin Center, go to App registrations and find your application.
2
Configure Extension Attributes
Go to Manifest and add custom extension properties, or use Azure AD B2C custom attributes if applicable.Alternatively, you can populate standard fields like
extensionAttribute1 through extensionAttribute15 via:- PowerShell commands
- Microsoft Graph API
- Azure AD Connect (for on-premises sync)
3
Update User Properties
Populate the custom attributes for your users using one of these methods:Via PowerShell:Via Microsoft Graph API:
4
Map to Claims
Return to your application’s Attributes & claims and create a new claim mapping to
user.extensionattribute1 (or your chosen extension attribute).Test SSO Configuration
1
Assign Test User
In your application settings, go to Users and groups and assign a test user to the application.
2
Test SSO Flow
Use the Test option in the SAML configuration or initiate SSO from your LMS to verify the configuration.
3
Verify SAML Response
Check the SAML response to ensure that your custom
lms_user_id and other configured attributes are present with the expected values.Configure Conditional Access (Optional)
1
Navigate to Conditional Access
In Azure AD, go to Security > Conditional Access to set up policies for your LMS application.
2
Create Policy
Create a new policy to control access to your LMS based on conditions like:
- User or group membership
- Device compliance
- Location
- Risk levels
3
Apply to LMS Application
In the policy settings, select your LMS application under Cloud apps or actions.
Linking with Your LMS Integration
Now that you have configured the custom SSO attributes in Azure AD, you can reference these in your LMS integration setup:1
Access LMS Integration
Navigate to the integration configuration page for your specific LMS platform.
2
Configure SSO Mapping
In the SSO or user mapping section of your LMS integration, specify:
- SSO Attribute Name:
lms_user_id(or the claim name you configured in Azure AD) - LMS Field: The corresponding field in your LMS (varies by platform)
3
Test Integration
Perform a test sync or SSO login to verify that users are being correctly identified and mapped between systems.
Congratulations, you’re all set! If you face any issues with the steps mentioned above, please contact us by emailing integrations@stackone.com. We’re always here to assist you!
LMS-Specific Attribute Requirements
Different LMS platforms may require specific attribute names or claim formats:Common LMS Attribute Mappings
- Docebo: Use
user.user_idfor the user identifier - SAP SuccessFactors: Typically uses
user.USERIDor email-based identifier - Workday Learning: Often requires
user.employee_id - 360Learning: Usually accepts
user.mail.
Troubleshooting
- Ensure claim names match exactly between Azure AD and your LMS configuration
- Verify that all required claims are mapped and have values for your users
- Check SAML assertion format and namespace usage
- Confirm that users have the necessary attribute values populated in their Azure AD profiles
- Use Azure AD sign-in logs to debug SSO issues and view SAML token contents